25 Nov 2013

Beau XOXO Giveaway Video! *LAST FEW DAYS!*


We are now in the final few days of our fabulous GIVEAWAY! We have created this little video to give you some more information on Beau XOXO and show you what we couldn't resist buying from this stunning online boutique!


This giveaway will run through to 29th November 2013! Anyone can enter and the winner will get a gift card to spend in the Beau XOXO online store! Here's a little link to the website for you so that you can pop over and see all of the beautiful items on offer!

http://www.beauxoxo.com/


‘Beauxoxo is an online boutique that boasts an array of lovingly handmade pieces, for wonderfully affordable prices. What started back in 2010, as a girl's dream for chic yet inexpensive hair accessories, has now blossomed into a worldwide success, and now everyone is able to adorn pieces that are complimented by a unique blend of both whimsical and playful charm.' 

We’re so excited for you to get involved, so please feel free to share this on twitter and social media! Obviously don’t forget to enter the competition to your hearts content! 

If you have any questions, please do not hesitate to get in touch. 

a Rafflecopter giveaway

18 Nov 2013

Christmas Caking, Baking, Making Time!!

Christmas Caking, Baking, Making Time!!

It is a bit early to be cooking Christmas puddings, however, Fiona (Orla's sister) came across a picture of a Santa cake! No instructions or tutorials just a picture, and Orla believed that she could make it! 

So we studied the picture, and put our plan into action! We decided to make a Sponge Cake, 
with jam and Buttercream filling!

We stacked the sandwich tins to find out how many layers of cake we would need to get the height needed, and 4 sandwich tins were about right, so 2 cakes worth! 

We got on with making the "2" sponge cake/ "4" single sandwich tins worth. This was the recipe we used, good old "Mary Berry"!!
 Leave them to cool as normal...
Whlist they are cooling down, make your Buttercream filling. This was the recipe we used,

Remember : You have to double everything! As you have to fill and cover 2 cakes! 
It seems alot of everything, buttercream etc, however you will need/use it ! Trust us!

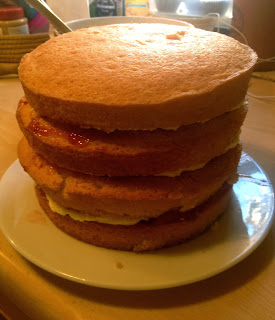
Once all the cakes are cool, start to build your tower of cake! Fill each layer like you normally would, Jam and Buttercream between each layer, once it looks something like this...
You will need to stableise it!! Take 3 straws/chop sticks and cut to the height of the cake and insert in a 'triangle' shape through the middle area of the cake.

Time to CARVE! Take a bread knife, with a serrated edge, and make a Dome shape. Try and make it as smooth as possible, it will look a bit dogy...but go with it! 


You will need to give the cake a crumb coating next! Take your left over Buttercream, and go around the cake, (you may need to make some more) Making a smooth layer all around the cake. Making sure you get all the loose crumbs. (This is what makes it smooth and not lumpy when you put your layer of fondant ontop)
 Then put in the Fridge! Leave until its really solid and cold!!!
LEAVE IT.....!!!! I SEE YOU!


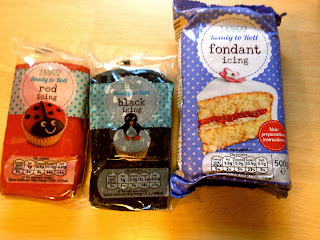
Now for the fun bit! DECORATING! Grab your Fondant, White, Red, Black...
Roll out the red into a thin circular sheet of fondant. 

Remember - to put down icing sugar on the surface or it will stick to the table!!

Using your rolling pin, roll a side of the red sheet around the pin, lift, and then drape the sheet over the cold cake. This should create this type of image...

Carefully using your fingers and cupped hands, smooth down the edges and flare out the bottom of the sheet until you cover it evenly.  
TIP - (Use a pizza cutter to put around the circular cake)
Your almost there!!
Time to get fiddly with the fondant, create a thin layer of white, cover the Cake Base, Put the Red Cake on the white base...


 Then create another thin layer of white, shape into a beard, and use water to stick it to the cake. Carry on making the eyes, nose, little arms, and legs with cuffs on all four. Make a little hat for Santa and finish off by making a little buckle!


If you have a red ribbon, and a little 'Merry Christmas' sign (you could pipe it on) then stick it on!

and YOU'VE DONE IT! Fun and Easy! Its a simple cake, but looks great! and We've really enjoyed making and decorating it!!!


Thanks for checking this out! 


Twitter 
Instagram 
Youtube 

14 Nov 2013

Third & Final Day In Disneyland Video!

Hello lovelies!

Only one day to the weekend, so to give you all a boost this chilly Thursday, we have posted the final video in our Disneyland Paris October trip series! Enjoy watching what we got up to and please let us know what you think or if any of your are planning to visit soon, or if you went during Halloween too!

Final Day


Please like, comment and subscribe to our channel if you enjoyed this! Don't forget to also follow our blog using the Bloglovin link below! Comment below if you want to share your looks - we love being nosy and seeing what you're up to too!

Thanks for checking this out! 

Twitter 
Instagram 
Youtube 

13 Nov 2013

Christmas Is All Around!

So the time of presents, food gluttony and Christmas parties are upon us! Its November (or Movember for some!) and already Christmas decorations are up in Shopping Centers and in Towns all around the UK! It always surprises both of us how quickly it comes around, however were not complaining! 


Christine and I have always been huge Christmas lovers! So much so, that Christine got called "Christmas" at work for a good while, which always put a smile on all our faces!

Both of us have a real thing for Christmas decorating and baking! Every year we like to either change up the themed colour on our trees/table decorations, or try and create and make a new Christmas bake to share with everyone! Whether it be biscuits, a highly decorated cake, or a cluster of christmassy cup cakes!

So we have already been buying a couple of Christmas Bits, I bought a new PJ top, £6 in 'Primark!'


 Its a combination between Disney and Christmas which puts a big smile on our faces!

Primark's a great place to get lots of Christmas bits and bobs this year. From candles, gifts, bedding, decorations and wrapping, its a one stop shop for a big Christmas splurge!

This being our first Christmas with our Blog and YouTube channel!  I'm sure we'll be doing festive updates with all the seasonal activities we'll be getting up to. Whether its Christmas hauls, baking, or general festiveness! 

Watch this Space! 


Thanks for checking this out! 

Twitter 
Instagram 
Youtube 

12 Nov 2013

Hair 'Style' Today, Gone Tomorrow.....

This weekend was quite a lazy one for us. We were both feeling a little bit under the weather and not on our usual top form. Instead of risking making ourselves feel worse, we did what all self respecting girls do and headed out to the shops to stock up on chocolate and diet coke, before heading back and watch an entire season of Sex & The City! (The Aiden years, of course. what was Carrie thinking letting him go)?!

Anyway, while we sat and ate our weight in chocolate we also spent the afternoon playing with our hair. We have both had short hair in our time. Orla used to be a hair model (as mentioned in our introduction video). During this time, she didn't really have much say in the length or colour of her hair and ended up with some amazing styles. The later styles she sported were usually very short or even shaved right up at the back with just length left on top. I on the other hand have been cutting my hair short since I was in my late teens. The reason being, my hair is SO thin and fine and it usually looks much thicker when cut shorter.

While I enjoyed the illusion of thicker hair, I didn't like not having any length as I used to enjoy playing with different styles and designs in my hair. As my most recent short cut was a graduated bob, I do have some ways to go to get my hair to a decent one length style.

Orla on the other hand has already grown her hair to a better length and has managed to have the length evened out. This is largely why the hair styles this weekend were all on Orla's hair. Also, the hair extensions we used we old ones of mine from 5 years ago when I wore hair extensions most days. The colour match was much better for Orla than the ash blonde colour of my hair currently.

I started off by straightening and putting the hair extensions in Orla's hair. When she looked in the mirror, this cemented her decision to grow her hair!


The first thing I tried was a waterfall braid. I love this look as it looks really intricate. I think this would look better in hair with darker undertones or low lights, to really highlight the design of this look. The idea is to make your side pony tail look like it's encased in a cage of hair. This look would also work well on a normal ponytail. 


For a different look at the front of the hair, this simple twist is fun to add interest. We used a spiral stud to enhance the look and secured with a bobby pin underneath. 


For a more formal look that would work for a prom or posh 'do' this half up style is really cute! It was surprisingly easy to achieve and really suited Orla. With flowers added in the summer, this would be adorable festival hair! 


I then tried my personal favourite, fishtail plait. This is the style I want to wear the most, but my hair is still far too short to make this work on my own hair. It looks really chic and bohemian and I definitely think Orla needs to learn to do this one on her own hair! Super cute!


So which style do you like best? Let us know if you would like us to film any tutorials on how we achieved these looks or try out any others! We're currently looking for a new brand of hair extensions to try out too, so if you have any brands that you love, leave them in the comments below so we can check them out!

Please like, comment and subscribe to our channel if you enjoyed this! Don't forget to also follow our blog using the Bloglovin link below! Comment below if you want to share your looks - we love being nosy and seeing what you're up to too!

Thanks for checking this out! 

Twitter 
Instagram 
Youtube 


11 Nov 2013

Disneyland Paris Video - Day 2.....

Happy Monday one & all!

We thought we would treat you on this rather dreary Monday to the second installment of our Disneyland Paris October trip! Enjoy watching what we got up to and please let us know what you think or if any of your are planning to visit at Christmas time! We wish we were going back already!


Day 2 


Please like, comment and subscribe to our channel if you enjoyed this! Don't forget to also follow our blog using the Bloglovin link below! Comment below if you want to share your looks - we love being nosy and seeing what you're up to too!

Thanks for checking this out! 

Twitter 
Instagram 
Youtube 
9 Nov 2013

imPRESS Nail Review.....

If you're anything like us, then you will dream of beautiful nails with minimal work! We have tried every nail strengthening product on the market just to achieve the desired look but still haven't found anything we are in love with....yet. 


There has been quite some hype around imPRESS nails, so we have have been desperate to try these out. There was quite a large range of designs available from completely clear, ready to paint any colour to lace patterns and coloured tips. We opted for the classic french manicure design (£8.99) for our trial. 

The packaging claims that these may last up to one week and are extremely easy to apply! Application does stay true to it's word as all you need to do is peel off the adhesive strips, press them into place and go! We really loved the look of them once they were in place and followed the instructions to the letter. The instructions recommend not getting your hands or nails wet for up to 30 minutes after application. We played it safe and kept our hands out of water for well over an hour to try and ensure that the nails had the best chance of survival!

The nails did feel really quite secure once they were on which was great. Although, as the adhesive is not applied all the way up the length of the nail, so they can start to feel quite loose if caught on something. 

In order to give the nails half a chance at surviving, I put them on on Saturday before going out for dinner. They lasted the night very well and all of the following day. With a dance class, audition workshop and singing class. Unfortunately on the Monday the index finger nail came off. I tried to see if one of the spares would fit but none of them were really the right size. I opted to leave them as they were to see how long the rest of them lasted. I managed to keep the remaining 9 nails in place until the Thursday - so 5 days in total.

Although they didn't quite last the full week that they claim to, I thought that the look of these were great and I would absolutely purchase them again for  a one day event. A wedding or night out would be perfect for imPRESS nails!

Overall I feel that these were £8.99 well spent. I think I would keep some nail glue in my purse at all times just in case I was to lose one during the day as one nail falling off was not quite the look we were going for! 

Please like, comment and subscribe to our channel if you enjoyed this! Don't forget to also follow our blog using the Bloglovin link below! Comment below if you want to share your looks - we love being nosy and seeing what you're up to too!

Thanks for checking this out! 

Twitter 
Instagram 
Youtube 


7 Nov 2013

Disneyland Paris Video Is Up.....

Hello Lovelies!

Our new video is up! Check out what we got up to in our Disneyland Paris series of videos over the next week, we had such an amazing time, we can’t wait for you to see! 

Day One


Please like, comment and subscribe to our channel if you enjoyed this! Don't forget to also follow our blog using the Bloglovin link below! Comment below if you want to share your looks - we love being nosy and seeing what you're up to too!

Thanks for checking this out! 

Twitter 
Instagram 
Youtube 
4 Nov 2013

Poor Unfortunate Souls - Ursula Halloween Looks!

Hi Lovelies,

So, this is a little bit later than we expected BUT thank you so so much for checking out our Ursula from The Little Mermaid Halloween looks!

We have had some computer trouble over the last week and we were very concerned that our videos would be lost forever! Thank fully it all came good in the end! We were most concerned that we would have to re shoot this video, which would not have been ideal! It took 15 takes just to get the introduction and end bit because we were so tired and had a serious case of the giggles! Thankfully, we got there in the end!


This is Orla's full on make up look for Ursula - This would be perfect for any belated Halloween parties or general cosplay!


Christine designed this more every day/glam look for Ursula - Inspired by the colours her character uses in the film!


Please like, comment and subscribe to our channel if you enjoyed this! Don't forget to also follow our blog using the Bloglovin link below! Comment below if you want to share your looks - we love being nosy and seeing what you're up to too!

Thanks for checking this out! 

Twitter 
Instagram 
Youtube 

About

Two Girls, Best Friends, Sharing Secrets, Tips & Tricks! Make Up . Fashion . Health . Weight . Beauty . Vintage . Style . Shabby Chic . Design . Music . Disney . Costume . Fun . BFF Twitter - @Twiceuponblonde Instagram - Twiceuponblonde YouTube - http://www.youtube.com/channel/UCKztQ7sRCbFQZeGXdQOMEOw/about